

Candidate profile
Everything Nextal knows about one candidate, on a single page — identity, contact info, status, work history, skills, files, conversations, and notes. The header is edited in place; the profile, in a side panel.
The candidate profile is the complete record for one person — everything Nextal knows about them lives on this page. When the page loads you’ll see a brief moment with a spinner, then the full profile appears.
The page is organised top to bottom into five sections:
- A header row with the candidate’s name, star rating, social links, and a delete/merge menu.
- A row of four key-fact cells (contact info, address, status, communication preferences).
- An AI Summary card (visible when the Nextal AI integration is enabled).
- A tab bar with nine tabs covering every interaction with the candidate.
- A small line at the bottom showing who created the candidate and when.
The top of the page
Name and avatar
The candidate’s avatar is shown as a circle with their initials — no photo. Their first and last names appear next to it. Hover the name and a pencil icon appears; click anywhere on the name area to open a small editor where you can update both fields. If a candidate hasn’t been given names yet, you’ll see “First Name” and “Last Name” as light-grey placeholders.
Star rating
Five star icons next to the name let you rate the candidate from 1 to 5. Click a star to set the rating; click the same star again to clear it. Each click saves immediately.
Social links
Five icons on the right are clickable links to the candidate’s online profiles:
- Website
- GitHub
To add or change a URL, click the pencil that appears on hover. URLs must be valid web addresses.
The 3-dot menu
The menu only appears for team members with delete permission. Two options:
- Delete candidate — opens a red confirmation dialog. Once confirmed, the candidate is removed and you’re sent back to the dashboard. If the candidate has applications attached, deletion is blocked and you’ll see “Candidate can not be deleted because it has applications”.
- Merge with another candidate — only shown if you also have edit permission. Opens the merge assistant with this candidate pre-filled as the surviving record. See Merge duplicates.
The key-facts row
Four boxes side by side. Click any of them to open an inline editor.
Contact info
The candidate’s email address and phone number. Click to edit either field. Both are optional — you can save a candidate with just one or even neither.
Address
The candidate’s postal address — either a free-form string or a structured address with city, province, postal code and country. When you edit, you’ll use an address picker that geocodes the address (so it can be used for distance-based matching later).
Status
A colored pill showing the candidate’s current status (New, Active, Hired, Inactive, etc.). Click to pick from your organisation’s configured statuses. The color of the pill matches the status’s level — blue, grey, green, red, or orange — making it easy to scan at a glance.
The available statuses are managed by your admin in Settings → Customization → Candidate statuses.
Communication preferences
How the candidate prefers to be reached, and in what language:
- Channel: Email, Phone call, or Text message
- Language: French, English, or Spanish
Email templates and SMS automatically pick the right language when you reach out.
AI Summary
Between the key-facts row and the tab bar, Nextal displays an AI Summary card when the Nextal AI integration is enabled for your organization.
The card contains:
- AI-generated summary text — a paragraph synthesizing what Nextal knows about the candidate from their profile and reference responses.
- “AI-generated — may be inaccurate” disclaimer, shown directly below the summary.
- Based on: N references — how many reference responses were used to generate the summary.
- Generated on <date> — when the summary was last produced.
- A Regenerate button — triggers a fresh summary on demand (useful after new references come in).
- Helpful / Not helpful / Report inaccuracy feedback controls — lets your team flag quality issues directly from the profile.
The AI Summary helps recruiters quickly assess a candidate before diving into the full reference responses. It is advisory — always verify the underlying data before making hiring decisions.
The tab bar
Nine tabs cover every interaction with the candidate. Each tab title gets a small grey count next to it when there’s content there (showing “99+” at 100 or more):
- Files — resumes, cover letters, signed offers. See Files & resume.
- Profile — overview, experience, education, languages, custom properties. See The Profile tab below.
- Emails — full email history with the candidate. See Emails.
- Texts — the SMS conversation. See Text messages.
- References — reference requests and responses. See Reference requests.
- Applications — jobs the candidate has applied to. See Applications tab.
- Comments — internal team notes. See Comments.
- Surveys — candidate surveys and interview feedback. See Surveys & feedback.
- Tasks — follow-up reminders. See Scheduled tasks.
The active tab is remembered in the URL — copy the address and send it to a teammate, and they’ll land on the same tab.
The Profile tab
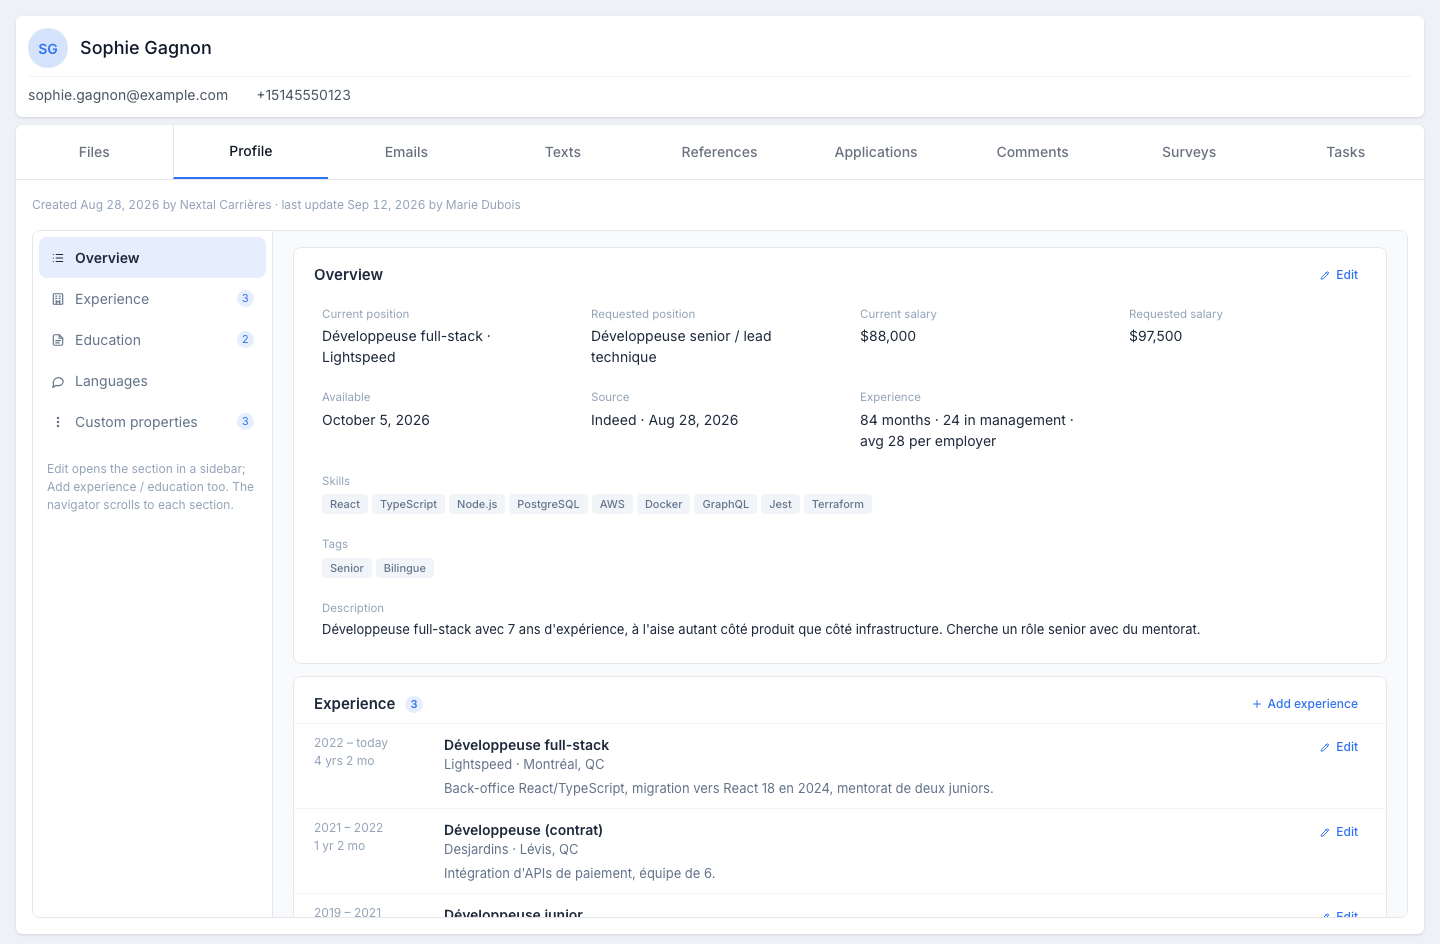
The Profile tab gathers everything that describes the candidate beyond the header, in six stacked sheets. On the left, a section navigator — Overview, Mobility, Experience, Education, Languages, Custom properties, with the number of entries — highlights the section on screen and scrolls to the one you click. At the top, a line recalls when and by whom the candidate was created and last updated.
Unlike the header, nothing is edited in place on this tab: every sheet has an Edit button (or Add experience / Add education) that opens a side panel. An empty field shows as a dash.
Overview
- Current position / Requested position / Current salary / Requested salary — their current role and the one they are looking for, plus their pay context.
- Available — the date from which they can start.
- Source — where the candidate came from, with their creation date.
- Experience — the months of experience, the months in management and the average per employer.
- Skills and Tags — as chips. Tags are for organising (campaigns, geography, status); Skills for technical abilities (React, Project Management, etc.).
- Description — free text for anything that does not fit elsewhere.
Mobility
Where the candidate can work — not to be confused with the header address, which says where they live. Three lines:
- Can work — a single line, always in the same order: the accepted work modes (On-site, Hybrid, Remote), the regions (cities or provinces; the first four, then “+n”), the maximum commute (e.g. ≤ 45 min), then relocation — No relocation, Relocation: open or Will relocate — and, in italics, the relocation note if there is one. Whatever is not filled in is simply left out; a completely empty block shows as a dash.
- Lives in — a read-only echo of the header address (city, province · postal code, or the free-form address). To change it, edit the address in the key-facts row.
- Updated — the date and the person who last entered the mobility. When the candidate filled it in themselves while applying on your career site, the line says Career portal. The line only appears when mobility is filled in.
This mobility is what the Work mode, Region and Relocation filters of the candidates list and the kanban mobility hint read. Candidates fill it in themselves when your admin activates the Mobility field of your career site’s application form.
Experience
A timeline, newest at the top. For each job: the span (2022 – today) and its duration, the job title, the employer and location, the description. Entries are typically created by the CV parser when a candidate uploads their resume; Add experience creates one by hand, and every entry has its own Edit button.
Education
Same layout as Experience, for schools: the span, the degree, the field of study, the school, the grade and the description. Add education and Edit per entry.
Languages
The French and English levels, on a six-level scale — from No knowledge to Native — shown as a bar.
Custom properties
Any extra fields your admin has added (visa status, remote preference, preferred city, etc.), one per line. The navigator’s counter says how many are filled in.
Editing the profile in the side panel
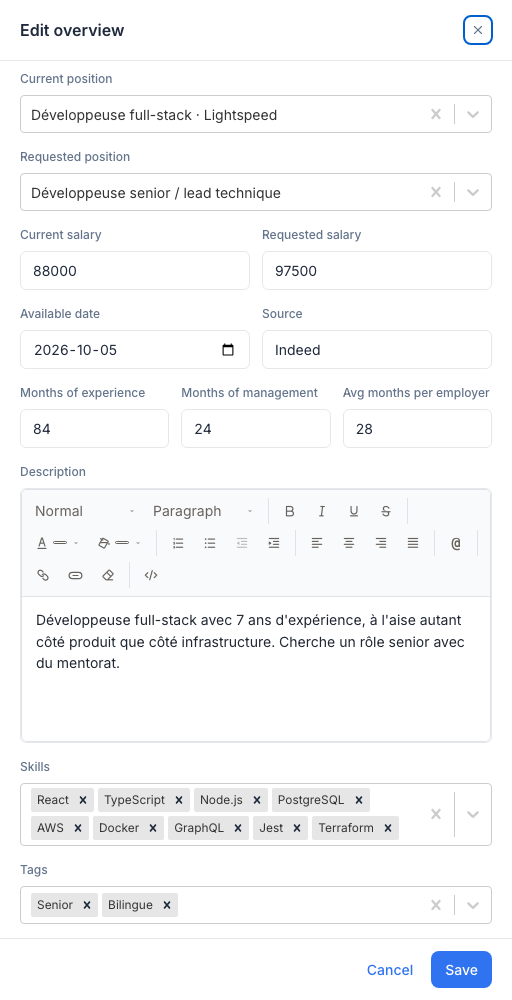
Click Edit on a sheet, or Add experience / Add education:
- Overview — every field of the sheet in one panel: positions (pick from the list or type a new value), salaries (a number), available date, source, experience months, description, skills and tags.
- Mobility — the Edit mobility panel, with five fields: Work modes accepted (tick every mode the candidate would accept — On-site, Hybrid, Remote), Regions (on-site / hybrid) (pick from your organisation’s cities and provinces — the same lists as clients and jobs — or type a free value, kept as-is and shown in amber), Max commute (minutes), Relocation (No / Open / Yes; click again to clear) and Relocation note (conditions, cities, timing…; kept, but not shown while relocation is “No”). Save is only enabled once something has changed; clearing all five fields clears the block.
- Experience — job title, employer, location, From / To dates (leave To empty for a current position) and description. On an existing entry, the panel also offers Delete, with a confirmation.
- Education — school, degree, field of study, grade, dates and description. The same Delete button when editing.
- Languages — the level of each language, by clicking the level you want (click it again to clear it).
- Custom properties — one field per property, of the type your admin configured (text, list, date…).
Save applies the change and closes the panel; Cancel discards it. An end date before the start date, or a salary that is not a number, blocks the save with a message under the field.
How inline editing works in the header
The top of the page — name, rating, social links, contact info, address, status, communication preferences — is still edited in place:
- Hover the value. A border appears and a pencil icon shows up next to it.
- Click the value or the pencil. A small editor replaces the value.
- Make your change.
- Click Save to commit, or Cancel to discard.
When and by whom
A small line at the bottom of the page tells you:
- When the candidate was created
- Where they came from (the Source field, if set)
- Which teammate created them
- The last time the candidate was edited, and by whom
Who can do what
| What you want to do | What you need |
|---|---|
| Open and read the candidate profile | Access to candidates |
| Edit any field (name, contact, status, profile, experience, etc.) | Edit access on candidates |
| See the 3-dot menu | Delete access on candidates |
| Delete the candidate | Delete access on candidates |
| See “Merge with another candidate” | Both delete and edit access on candidates |